GemCraft Zero Gem of Eternity Guide
Play Gemcraft Chapter zero here!
Basic tips
Gems
Dual gems are superior to pure gems, they get larger bonuses to their damage, range, and firing speed. This can further be improved with the Dual gem mastery skill.
Pure gems have the strongest special abilities. If you combine two gems of different types, you get both specials but with a decreased power. So if you want to use the special ability of a gem, combine it only with gems of the same type.
Try to avoid making gems containing more than two base colors.
If you have all 8 gem types available, you can create a prismatic gem. It will have all 8 abilities (in a very small portion each though) and some bonuses to its basic values.
Towers
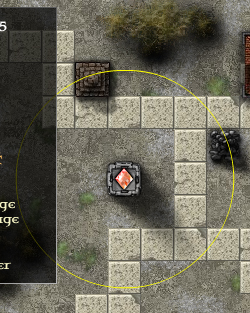
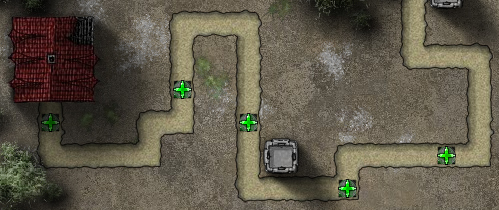
Place your towers in positions where they can cover the longest path possible.
It might be worth placing a tower at one square distance from the path instead of right next to it.
Look at the range indicator (yellow circle) of the inserted gem to see how far it can shoot, and place it in a tower that can give it the longest path cover.
It’s better to have more towers with somewhat weaker gems in them, than a few towers with stronger gems.
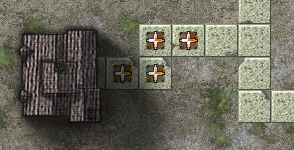
Destroy misc buildings to place towers at key positions
Traps
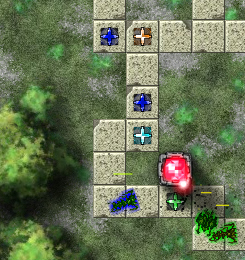
Place a trap near a group of towers and place a slowing gem in it, this way the monsters will have to crawl by the towers for a longer time, taking more shots.
Place a trap right next to an other one, place a slowing gem in the first trap and a mana gain/armor reduce/shocking gem in the second one. You can leech more mana from the slowed monster or have a greater chance of shocking/piercing it.
Monsters
Click on a monster to view info about it.
Monsters take more and more mana each time they reach your wizard towwer, be careful with hordes of fast monsters.
Wave types
There are five different monster waves:
-Normal
-Armored (slower, but tougher, can have a very heavy armor on harder levels)
-Runner (weaker but much faster)
-Swarm (lots of weak and fast monsters that take only a small mana when reaching your wiztower – they can be dangerous though by attracting your firepower and letting the tougher monsters pass through)
-Giant (a few strong and armored monsters, a great source of mana but can be very dangerous)
Waves can come from the main monster base, and in addition from minor monster bases, via paths from outside the area, or both.
The wave stones on the left side of the screen show you what kind of monsters will appear and where they will arrive from.
Minor monster bases
Sometimes it’s worth destroying the smaller bases, but not always. You might want to get ride of a minor base if it’s too near to your wizard tower, or if it’c connected to your wiztower with a path otherwise not used, and so you would have to make additional towers and gems to protect your flank. It’s not worth spending gems on destroying a minor base if it’s far away from you. Keeping a minor monster base can be especially good if it is far from both your wiztower and the main monster base, because it can make the coming waves more loosely spread, giving you more time to kill the monsters one by one.
If you destroy a minor monster base, the monsters that would come out of it will be “redirected” to the main monster base.
Beacons
Don’t destroy a beacon unless necessary, especially at the beginning of the battle. Use your mana to build up your defenses first.
Watch out for shield beacons. If invulnerable monsters drag your towers’ attention, all the other monsters can slip through your defenses unharmed as well.
If there are healer or shield beacons near your wizard tower, you might want to build your defense line closer to the monster base so that the monsters will have to get through your defenses before being healed or shielded. You can kill all monsters coming in the first waves so the beacons won’t be any help for them, and you can wait with destroying the beacons until the later waves when more monster will get through.
Mana management
If you plan to use the mana pool spell, use it early, this way you get more total mana in the long run, thanks to the increased mana gain multiplier.
Keep an eye on the mana bar. if it’s filled, all additional mana you would gain from slain monsters is lost. Use the mana pool spell to increase your mana capacity.
How to get the gem type you want
First, look for what types of gems you can except on the level. You can see it when you roll over a level icon on the map.
If you want a gem type that is not one of the available ones for that level, learn the mastery skill for that gem type, this will give you low grade starter gems (up to a grade 2 and a grade 3 gem), which you can use to transmute other gems thus making more of that type.
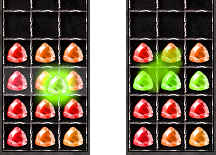
To transmute gems, you need a pure gem of the type you want to make more gems of. Place 2 or 3 pure gems of no higher grade in one row in your inventory, Then select the gem bomb spell and drag the gem you want to “make more of”, on the other gems. The gem will blast and transmute the other gems, giving you up to 3 gems of the same color instead of 1 you initially had.
Make lots of grade 1 gems to have a great chance of getting the gem type you want. You can go on from there by transmuting.
if you can’t beat a level and tried multiple times:
-Reassign your skill points. It can make a great difference. Different levels and battle modes may require very different skill configurations.
-Level up by going back and beating previous levels in new battle modes – the XP you gain in each mode adds up. Look out especially for highlighted modes which give 3x XP.
-Level up by going back to an early level and summoning more monsters – this way you can reach a much higher XP for that level/mode.
Advanced tips
Poisonous path
You need some green gems for this, so it works only if the level gives you some or if you have learned the poison mastery.
Create up to five green gems, grade 1 or 2, no need to go higher. You can transmute other pure gems by throwing your existing green gems on them as gem bombs.
Place traps at a distance from each other so that the poison effect from the first trap lasts until the monster gets to the next trap.
Put the green gems in the traps and you are safe for the first dozen of waves or even more, depending on the level you play.
Use this tactics on easier levels where monsters have so few hit points that most of them won’t get past the traps alive. It can also be very useful in swarm mode (with lots of weak monsters) and carapace mode (because poison ignores armor).
Mana farming
This is an essential for longer and harder levels.
Place a few traps close to each other and as close to the monster base or to junctions as possible. You want the monsters to be alive in full numbers when marching through your traps so that you can leech the most mana possible.
Don’t place towers near your mana farm, they might kill the monsters before you can squeeze all the mana you can out of them,
Learn mana gain mastery to receive more mana and to start with orange gems.
Build up your mana farm gradually. If you spend too much mana on it at the beginning, you may end up having no towers or proper gems to defend yourself and lose more mana by the monsters reaching your wiztower than what you earn
with your mana farm.
Place a slowing gem in the first trap, this will make some of the monsters spend much more time crawling through your mana traps, making the traps shoot more and give you more mana.
Swapping your strongest gems
If you have to defeat an enemy with lots of hit points and armor, like a guardian or a wave of tough giant monsters, place towers at different key positions and replace your most powerful gem, keeping the enemy within its range.
Damage bonus with gem transmute shrine
If you are on a level which has a gem transmute shrine in it, fill your inventory with grade 1 gems, then drag one of the gems into the shrine. This gives a 10% (or more if you use a higher grade gem) damage bonus to all the gems.
(Warning: this damage bonus does not stack; if you transmute these gems again, you won’t get an additional damage bonus)
Deling with summoned monsters
The risky point in summoning more monsters is that every time you drop a gem on a wave stone, the armor level of the monsters in that wave will get higher, and they can easily become bulletproof against your towers. This limits the times you can anger a wave, but with an armor reduce shrine, you can tear of some of their armor so you can summon more and go for a higher score and XP.
Splash tower and slowing traps
If you have a good splash (red) gem (or a gem with a strong splash component in it), build one or more traps around the tower you place the gem into, put slowing gems in the traps, and call multiple waves. The splash damage will give your gem a much higher effective total damage, as the horde of monsters, tightly crowded by the traps, tries to get past the tower.
Gems for longer levels
As you progress through the waves, try to create dual gems of grade 6 or even higher. Grade 4 and 5 gems won’t be a match for the tougher monsters coming at later waves. Their naturally higher armor level renders low grade gems almost useless.
(gems’ special attributes ignore armor so you still can have a good use of lower grade gems in your traps).
How to survive the last waves
If things go grim, switch the game speed back to normal, so you have more time to react (e.g. replace gems, build some “emergency” towers, throw your gems).
Don’t spend anymore mana on new gems (keep it reserved in case a monster reaches your wiztower), only to combine the ones you have, and do even that only if necessary (e.g. a giant monster with thousands of hp appears and you have something really powerful to stop it).
If you have only a few monsters left, but it seems you can’t destroy them before they reach your tower and you don’t have enough mana to make them run one more lap, don’t hesitate to throw your precious gems at them. A grade 6 or 7 gem can do a brutal amount of damage.
Guardian battle tips
Don’t destroy the arcane locks until you are near the final wave – use those grade 3 gems you want to throw at the locks against the monsters as long as you can.
Finish the minions first to severely reduce the armor of the guardian.
Killing the minions should give you enough mana to be safe if the guardian reaches your wiztower.
Plan ahead and place your towers and traps in key positions – the guardian will always appear at the monster nest/infested building while its minions will arrive from outside the map.
Place many towers along the way, and when you have only the guardian left to kill, use a few or even only one high grade (possibly but not necessary, dual) gem to keep the guardian under a constant fire, switch the gem from one tower to another as the guardian moves on.
Use powerful slow and/or shock gems to keep the monsters, and most importantly, the guardian, slowly crawling by your towers.
Note that guardians may have immunities to some gem attributes. Click on the guardian to see more details.
Miscellaneous tips
When in Sudden death mode, have some gems to throw in case of emergency. If a monster gets near your wiztower, switch back to normal speed immediately and pick up a gem ready to throw if you have to.
gem transmute shrine helps getting shrine burst amulets
XP shrines: use them early so you will have the score bonus to all the waves – but also wait for a dozen or so monsters to be on the scene to get the instant score bonus for them.
If you have to throw gem bombs (and thus can’t get a “no gem bombs thrown” amulet), get some extra XP by destroying everything (small buildings, monster bases), especially in 3x XP modes.
If there are traps on the scene in some weak positions (not in junctions, out of the way of the majority of the monsters), it’s still worth putting an orange gem into it for some extra mana gain.
If you are at the last wave, and you have a gem which cannot reach the monsters any more (no free towers), don’t hesitate to throw it at the face of the remaining monsters. Don’t do this though if the monsters are likely to reach your tower alive (even sfter the gem bomb damaging them) and coming back for one more lap.
Go for pure gems to place into traps. Pure gems have the highest special values. Dual gems have superior damage, but their speicals are somewhat weaker.
If the game seems to lag, you can decrease the rendering quality in the options screen.
Be careful with starting waves early. Go for beating the battle first, come back for a higher score later when you have higher skills.
If you face a level that seems to be too difficult, but also has a mana tap shrine, use the shrine only at the final waves where you can leech more mana from each monster. This can give you some decent emergency mana injection that can save you if a few monsters get to your tower. It can also be rewarding to fire the mana tap shrine when you have some giant monsters on scene.
Be careful with the gem bombing mode.
If you click too much on a wave stone and run out af ammo, you can accidentally start the wave early with your “extra” click.
Gems are loaded from your inventory going from the top to the bottom. So if you have some gems that you definitely don’t want to throw, put them at the bottom of your inventory before entering the gem bombing mode.
It’s better to have more towers with less powerful gems in them than a few towers with powergems.
If monsters can reach your wiztower in the early waves, you are either doing something wrong (wrong tower placement, started multiple waves early without proper defenses), have a wrong skill configuration, or don’t have a level high enough to have a chance on that level. Losing that few dozens of mana by letting monsters into your wiztower at the beginning of the battle can be fatal in the long run.
Monsters are resistant to shots of the same color, but vulnerable to those of the opposite/complementary color.
The faster you kill a monster the more score you get for it, so it’s better to build your defenses near the monsters’ base.