There are now quests out for Decision 2 and some of them can be tricky. Especially the quest Seeker (find 30 hidden places). Fortunately there is a link in game that leads to a map that reveals all the hidden locations and ATMs. (Click the Achievements button on the area select screen, then at the bottom you will see a link that says Satellite view (link).)
Unfortunately, it is hard to orient yourself on that map as the areas are not defined and the territories are not easy to distinguish. Also, your starting location for each territory is not shown. For these reasons I have made the following updated maps.
(Click the images for a larger more usable version.)
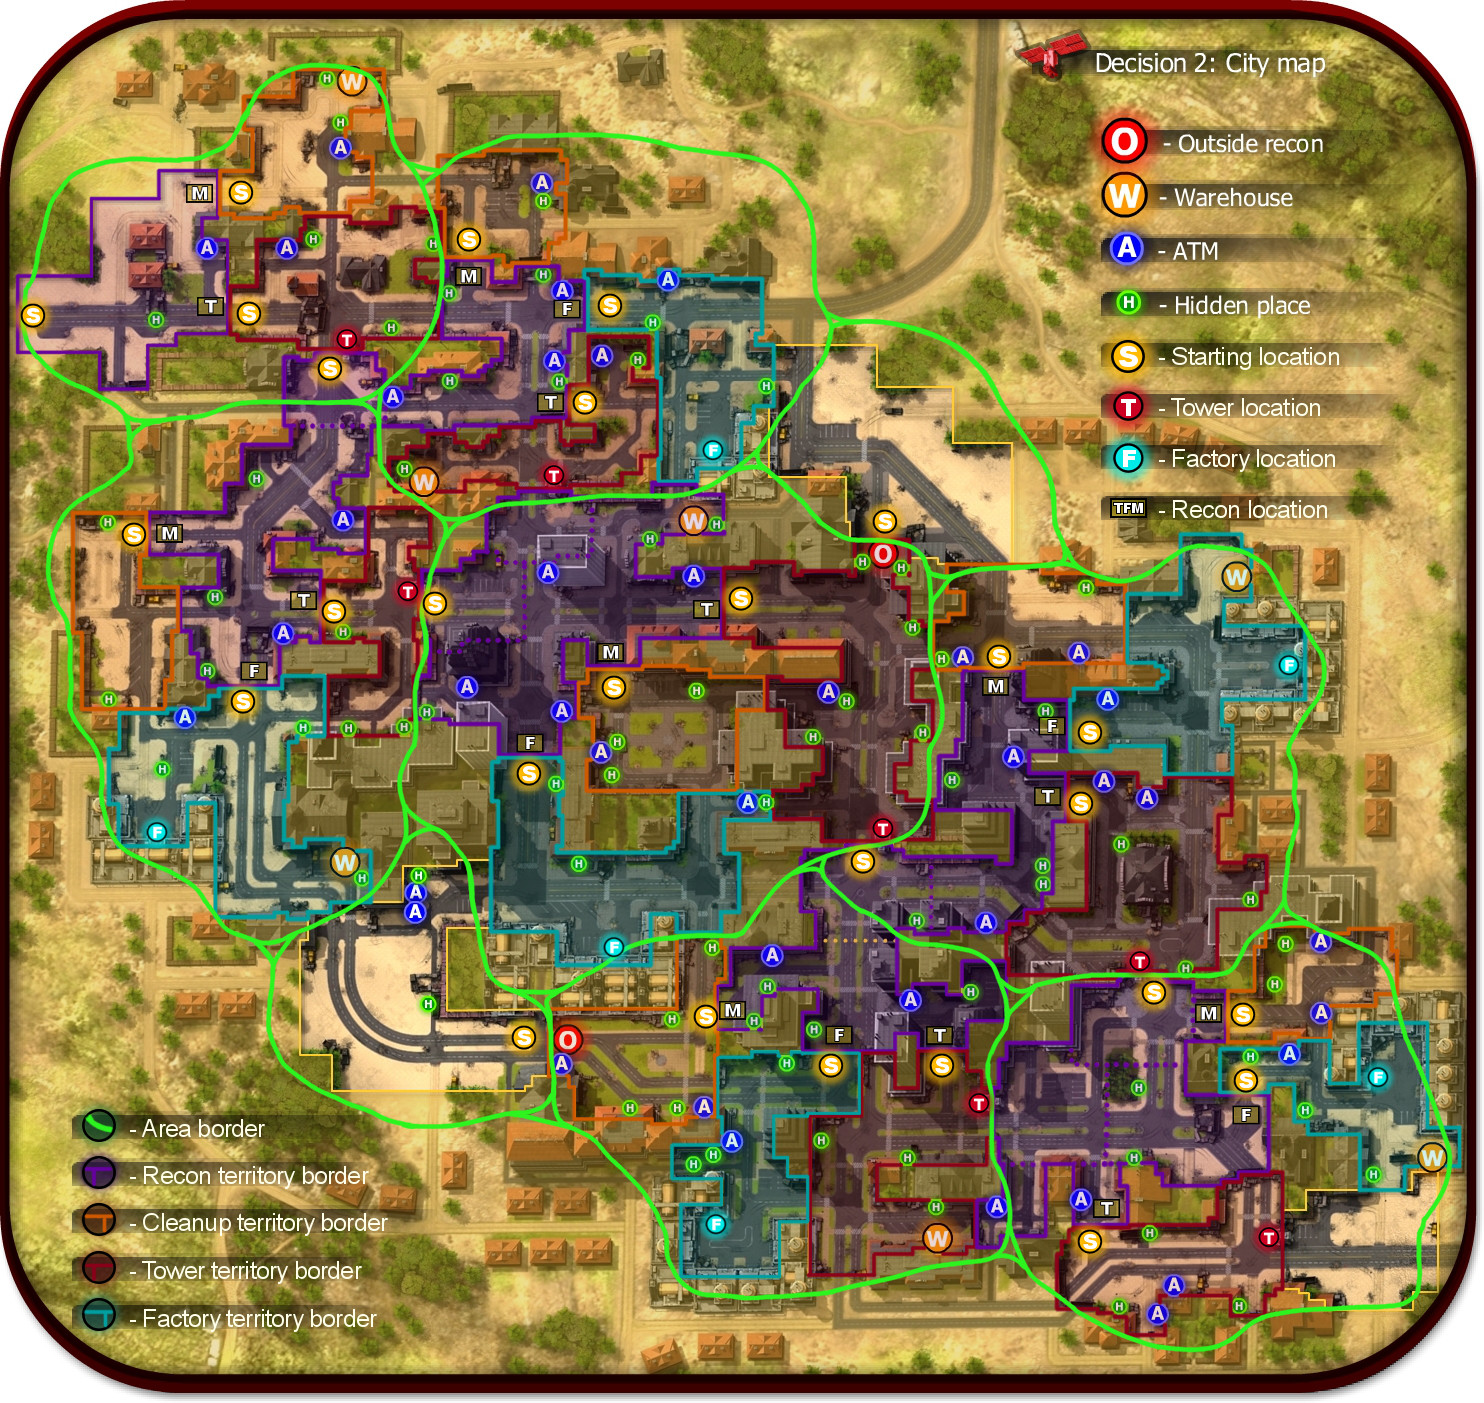
Decision 2 Map with area Borders, Territory Border, Starting Locations, Recon Locations, Factory Locations, Tower Locations, Hidden place locations, ATM locations, Outside locations, and Warehouse Locations
[Note: I have added only the following: area borders, territory border, starting locations, recon locations, factory locations, and tower locations. The rest was done by the original author.]
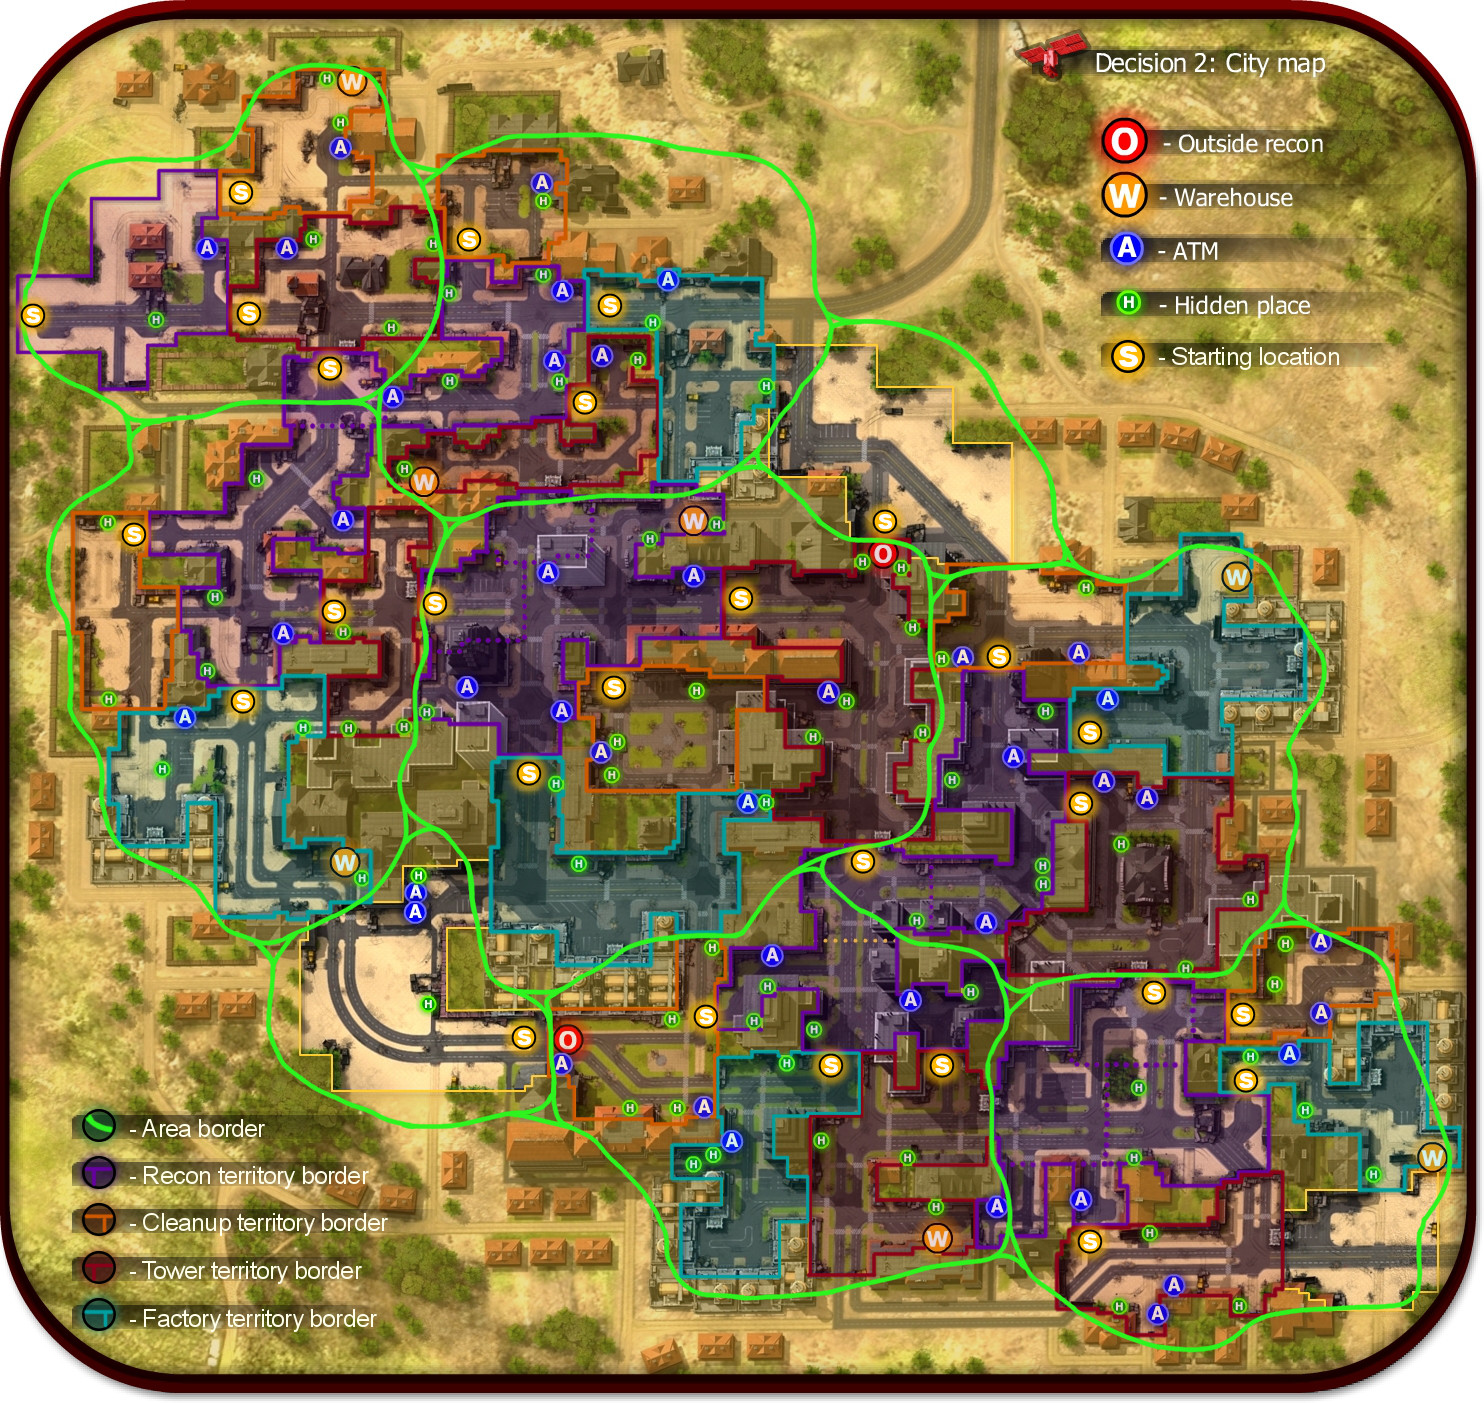
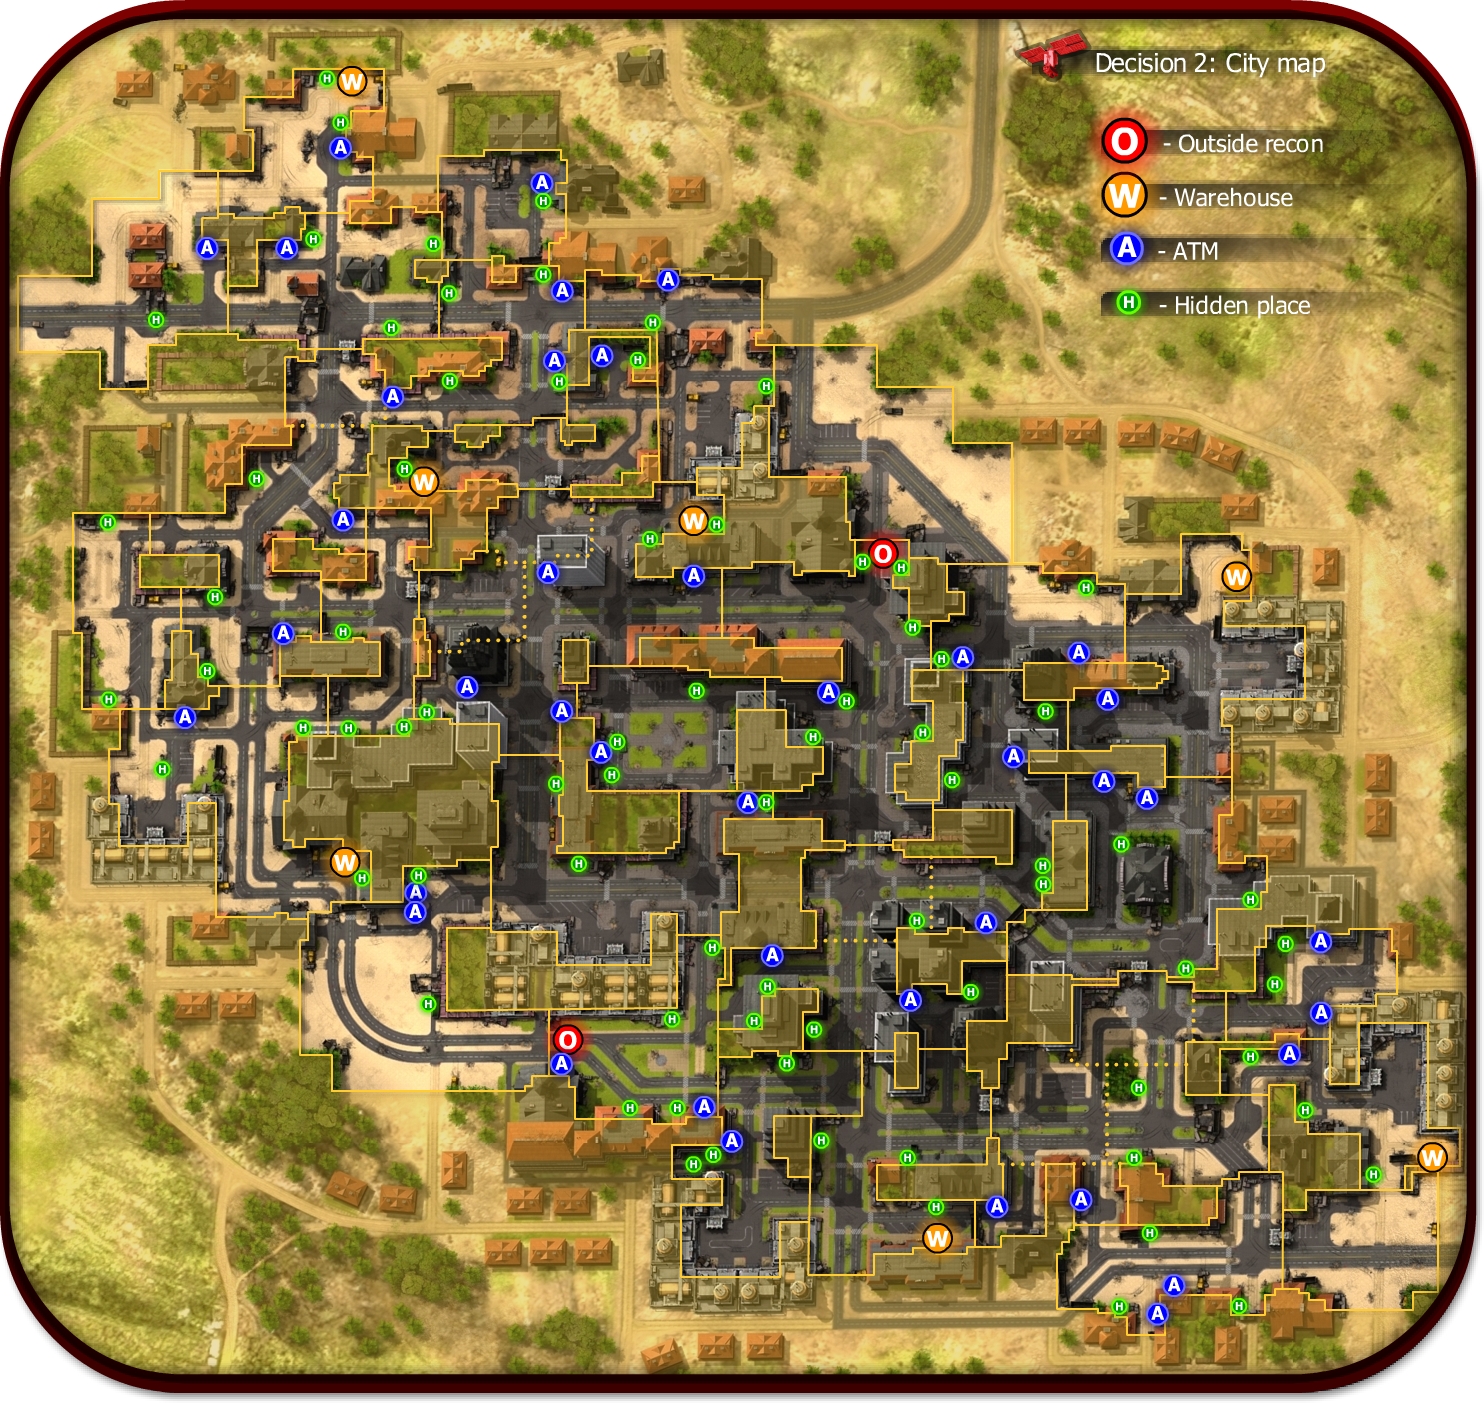
Decision 2 Map with Only Area Borders, Territory Border, Starting Locations Hidden Place Locations, ATM Locations, Outside Locations, and Warehouse Locations
[Note: I have added only the following: area borders, territory border, and starting locations. The rest was done by the original author.]
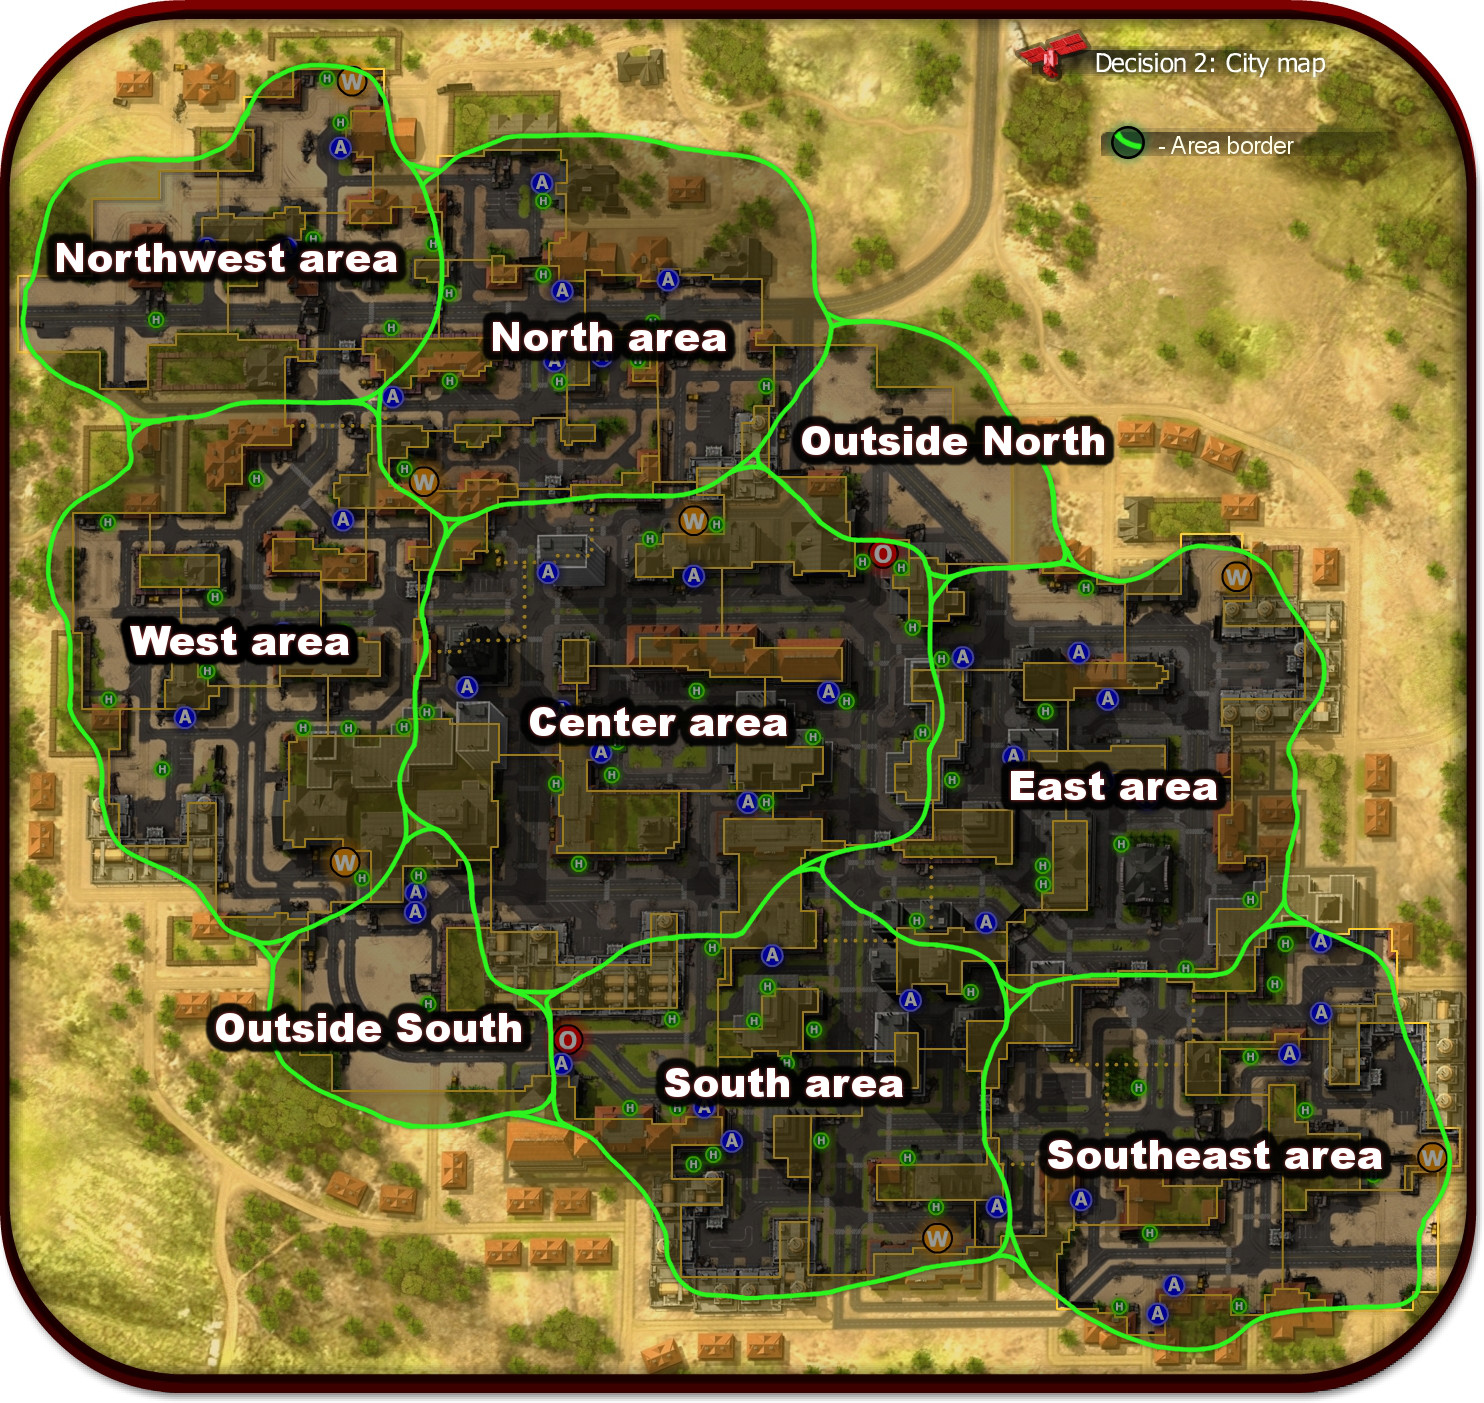
Decision 2 Map that Shows the Area Names
Decision 2: New City Legacy Edition Updated Map
I fixed the starting location in recon for the Southeast area, finally added the cistern locations, and changed the layout of the map key.
Map Explanations
Now for a little explanation on the maps.
The Borders: - The area borders are in think green, while the territories (which correspond to missions and ramble locations) are color coded.
The map territories correspond best to the ramble locations (although most mission correspond the same way). So if you want to access the territories with their full boundaries select an area, then sleet ramble, and then select recon territory, cleanup territory, tower territory, or factory territory (Note: you must complete a territory it will show up in ramble. Northwest area does not have a factory territory. Assault position, factory, and tower upgrade missions limit where a player can go within a territory, this is why I am recommending using ramble. Also, it is best to use ramble, when trying to locate missed hidden places and ATMs.]
The Markers: - The starting location (yellow/gold marker, with letter S, on map) is the place where your character will spawn when entering a territory. Use this to orient yourself at the beginning rambles and most missions.
- The factory locations (cyan marker, with letter F, on map) are where the factories are located in the factory territories.
- The tower locations (red marker on map, with letter T, on map) are where the towers are located in the tower territories.
The Recon Territories: - Some recon territories have shared start positions among different areas. The dashed line indicates a boundary that is area dependent. For example, the recon territory in the North area appears to have it's start location in the Northeast area. But that is only how it looks on the map. Also, notice that the start location in the North's recon territory is the same as the start location of the West's recon territory. If you were to enter the recon territory from the North area, the south purple dashed border line would be a solid boundary while the east dashed purple line would not be a border at all. If you were to enter the recon territory from the West area, the east purple dashed border line would be a solid boundary while the south dashed purple line would not be a border at all [notice how this is switched around].
Recon Locations: During Recon missions you must locate 3 places on the map (standing in each one for a period of time to complete scout that area). I have marked those locations on the map (only on the map with everything). The box with a T stands for Tower, the box with M stands for Main Street, and the box with F stands for Factory (in the legend the box has all three letters to avoid making separate entries). This three items are the names of the small little points in the game (yellow boxes on the ground with binocular graphics art in them) you scout in recon missions. If you buy the Detector, the game will point you toward this locations and show them on you HUD as well. (I added these locations on the map for extra convenience.)
Hidden Place Note: There is one Hidden place in recon for South area that looks like it belongs to the recon in East area. If you go to that Hidden place location in the East area recon (it looks like it's by a building and a bulldozer) you will not find anything. That Hidden place is in the recon forSouth area.
Cistern Note: For the achievement 10 cisterns you can destroy the same cistern multiple times to get the achievement (it does not need to be 10 unique cisterns). Simply destroying a cistern on one map and then exiting and re-entering the map to destroy the same cistern will add to the achievement count.
Mess Achievement Note: For the achievement Mess (rend 1000 bodies) it appears the player has to defeat the zombie while leaving it's body intact and then destroy the body while it is on the ground. For example, the player could defeat an enemy with the pistol (so the body remains intact) and then, when the body is lying on the ground, hit the body with the shotgun.
Closing: I hope that my additions to the FlyAnvil maps are helpful. Any questions or corrections feel free to post. Thank You!
[Note: I did not create the original map linked above, I hope I have made that clear throughout this entire post. However, I did add the area borders, area names, territory borders, starting locations, recon locations, tower locations, and factory locations.]
I don't suppose you could add the large cisterns to a future update, could you? I only destroyed 9 of the things, and can't seem to find the 10th.
Thanks : ]
I don't believe you have to destroy 10 different ones. Just go back to a territory where you know a cistern is and "rededstroy" it. That should add up the count.
If anyone has anything they would like to add for this Decision 2 map strategy guide, feel free to post about it. These maps should also suffice as a solid Decision 2 walkthrough. They should be enough to take you through the whole game.
It really helped me a lot with the achievement where you have to find 30 hiding places :3
Thank you so much without this map I wouldn't have done that so quick ^^
