Armor Mayhem Level Editor Tutorial
Map Editor Guide
Index
- 0. Getting Ready
- 1. Starting a new map or opening a map
- 2. The interface
- 3. Properties editor
- 4. Visual Editor
- 5. Entities
- 6. Drops
- 7. Waypoints
- 8. Links
- 9. Testing your map
- 10. Sharing your map
- 11. Tips
- 12. Host Armor Mayhem
It is important to make sure your flash player is up to date. I recommend a small visit to this link to make sure you have the latest version:
Get the latest version of Flash Player
Normally, when you start the editor, you should see a screen that looks like that:
If you want to open a map, press the “Open map” button (2)
If you need help, press the “Help” button (3)
In our case, we will create a new map. Lets press the “New map” button (1)
Once you press “new map”, you will see a screen that looks like that:
You will need to give a name to your map and choose a background color. If you are not sure about these informations, simply choose a random name and color. You can change these later in the settings of your map.
When you are done, press “Create”
Now that you started your map, you should see this screen:
Here are the elements you have to know:
- 1: This is the map viewer. You can drag/move it by clicking on the background.
- This button will lead you to the properties editor.
- This button will lead you to the visual layers editor. This is where you will create the structure of your map.
- This button will lead you to the entities editor. In here you will add all the important stuff like spawn points and flags.
- This button will lead you to the drops editor. In here you will add weapon and health drops.
- This button will lead you to the waypoints editor. This is where you will define where the computer can go.
- This button will lead you to the links editor. You will create links that will tell the AI how to move between waypoints.
- This is the viewer bar. It can be used to zoom, hide/show hitzones and toggle some visuals on the background.
- This is the menu bar. Here you can save or close your map.
- This is where you will be able to share and test your map.
When you press the “Properties” button, the menu shoud change to this:
Here you can rename your map and modify its properties such as the background color.
The “map size” and “description” fields are the text that will show up when loading the map in-game.
Make sure to press “Save” before returning.
First of all, lets create the structure of our first map.
When you press the “Visual layers” button, the menu shoud change to this:
The map is separated in layers. Think of them as transparent paper sheets put on top of each other.
You can hide or show a layer by pressing the check box next to it.
There are two types of layers:
– Static: These layers will only contain static objects
– Animated: These layers will only contain animated objects
The layer 6 will be on top of all layers.
Lets edit the layer 5!
Now that you clicked the “Edit” button next to a layer, this menu should show up:
Objects in this layer will show up in the objects list (1)
You can set a selected object collidable or not by checking its checkbox (2)
You change the display priority or delete a selected object (3)
You can add an object by selecting it in the objects list (4) and by pressing “Add Selected” (5)
Here is an exemple:
Once added, you should be able to see it on the editor view:
You can move, scale and rotate a selected object like in any graphics program.
You can select objects by clicking on them or by clicking on their name in the list (1)
Make sure to uncheck the Collidable attribute if you do not want the object to block the players (2)
Remember, if you want to put an object over/under others or delete it, use these buttons (3)
Here is my finished map structure:
(I turned on the “view hitzone” and “view background color”. I also turned off the grid.)
Doing that is a great way to see if you forgot to uncheck collidable on some objects.
5. The entities
Entities are a really important part of the map. Without them, the map won’t work.
Here is the entities menu:
1- The entities on your map will be listed here. You can click their name to select them.
2- This drop box will let you change the type of the selected entity.
Here is an exemple:
3 – This button will delete a selected entity.
4 – Pressing this button will add an entity to your map.
You can move an entity by selecting it and dragging it around.
Some entities can be rotated or scaled.
There are many families of entities:
Spawn Points (Death Match and team 1 to 4):
Nest (NOT WORKING). The nest is a feature that was never included but I had to leave it there:
Flags (from team 1 to 4):
Flag returns (from team 1 to 4):
Control Point:
Jump Pad:
Zones:
– Kill zone
– Hurt zone
– Low gravity zone
– Go up zone
– Slow zone
Note that you will need to include these following entities in order for your map to work:
– 1 spawn point of each type (I recommend more)
– 1 flag return and flag post of each type (no more than 1)
– 1 control point (I recommend more)
Here is my map with all of the needed entities:
Drops work pretty much the same as entities.
Please take note that armor drops are not working yet and might never work. Do not use them.
7. Waypoints
Waypoints are used by the AI (Artificial Inteligence) to navigate through the map.
Try not to put more waypoints than needed, as they will make the map slower to load.
When loading a map, every possible path is calculated. The more you put waypoints, the more time it will take to calculate.
To add a waypoint, go in the Waypoints editor, and press “Add New”
Where should you put waypoints?
You should always put a waypoint next to a important location (ex: a flag)
If there is a corner in your map, there should be a waypoint
Everywhere a change of direction is necessary (ex: jump to a platform) there should be a waypoint
You should always put waypoints at the sides of the platforms of your map. However, try not to put them too close to the border of the platform.
Here is an exemple:
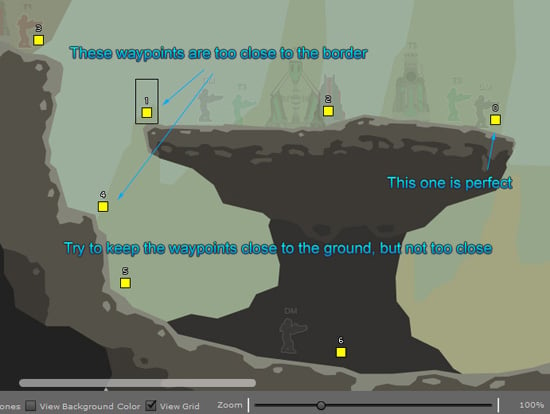
You have to cover every possible ground a player can move to.
Here is my map with all the waypoints layed out:

Lets create some links!
Now that your waypoints are layed out, it is time to link them together.
Think of the links as roads joining waypoints together.
Links are uni-directionnal. Which means that they go only one way. If you want two waypoints to be linked together, you will have to create two links.
There are two types of links:
– Walk
– Jump
Sometimes, you will need to jump to go from A to B, but you can walk/fall from B to A.
There are some rules about linking waypoints:
– Every waypoints must be accessible by any other waypoint.
– A waypoint always need a link going out, and a link going in.
If you don’t respect that rule, you won’t be able to share your map and it will crash when you test it.
Here is how the links menu looks like:

To create a link, press “Add New” (1) and select (click) the waypoint you want to start from. Then, select the waypoints you want the link to go to.
A window should apear:

Select your link type and press Create. Congratulations, you have created your first link!
Notice the arrow, it shows the direction of the link. A player at the waypoint 13 would know that he can walk to the waypoint 14.

Here is my map with the finished links:

You can also delete links by clicking the “Delete Link” button and clicking on the arrows.
You sould now be ready to test or share your map!
To test your map, press “Test Map” and copy your map code with the button.
Then, load the Armor Mayhem Game and paste it in the “Use map code” menu.
You can also open your map file and copy the code yourself.
Sharing your map is simple. Simply press the share map button. The editor will tell you if you have an element missing.
If not, you will be able to log-in and crop your own thumbnail.
A little word from the creator
Welcome to the Armor Mayhem Map Editor Guide. The map editor has been made public to let players design their own levels and share them to their friends and the world. The level editor is a little hard to use at first, because the game itself has a lot of elements of gameplay. You might want to read this guide before using it. If you have any comments or suggestions for the map editor, please use this forum thread. Please do not use my email.
Please keep in mind that this editor was not designed for the public at first and is still a little rough on the edges.
Enjoy the guide and remember to share your best levels!
Last updated: 2011-01-19